How to Make a Dark Kitchen Feel Brighter Without Replacing the Cabinets
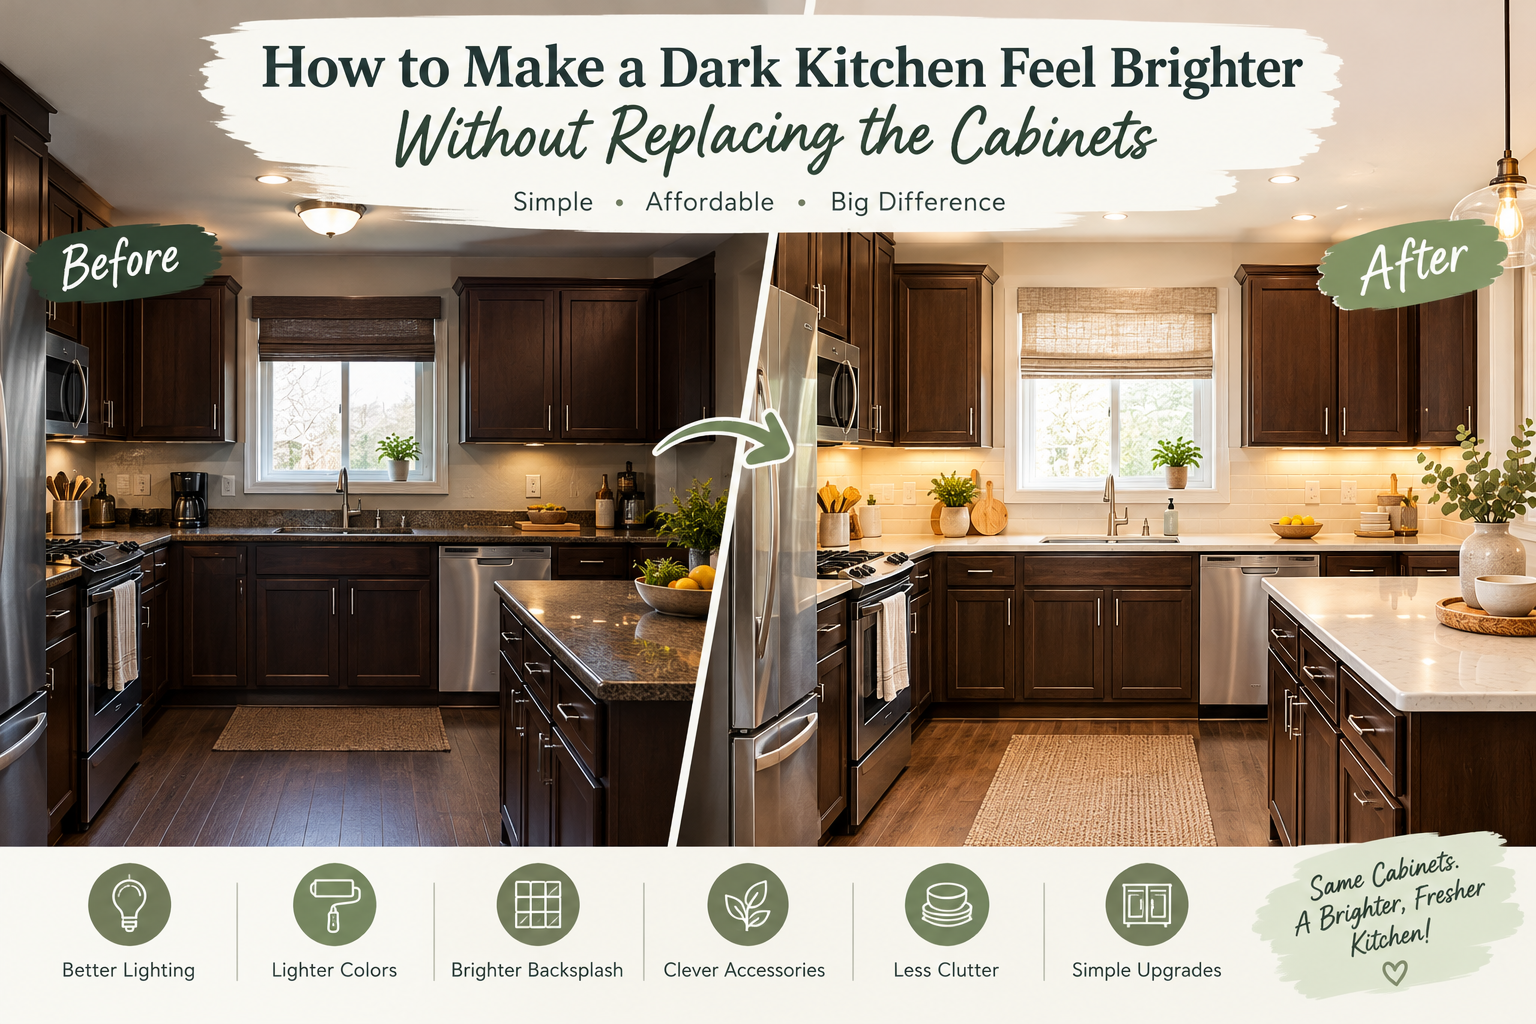
A dark kitchen can be frustrating, especially when the cabinets are perfectly functional but make the entire room feel smaller, heavier, or more dated than you would like. Maybe your kitchen has dark brown wood cabinets, deep espresso finishes, or older cherry-toned cupboards that seem to absorb whatever natural light enters the room. Perhaps you have a small window, limited overhead lighting, and countertops that look even darker once the sun goes down.
If any of that sounds familiar, you might have considered replacing the cabinets altogether. But before you start calculating the cost of a kitchen renovation, there is something worth knowing: you do not need new cabinets to make a kitchen feel noticeably brighter.
In many kitchens, the biggest improvements come from changing how light moves around the room, reducing visual clutter, updating a few contrasting surfaces, and choosing the right colors for everything surrounding the cabinets.
I have always found that kitchens are particularly sensitive to small design decisions. A different light bulb can change how a cabinet color looks. A lighter window treatment can make a room feel more open. Even clearing a crowded countertop can help the whole kitchen appear cleaner and more spacious.
The goal is not necessarily to turn a dark kitchen into an entirely white one. Dark cabinets can look beautiful, add depth, and create a warm, sophisticated atmosphere. The trick is to balance them with enough light, contrast, and breathing room that they feel intentional rather than overwhelming.
In this guide, we will explore practical ways to brighten a dark kitchen without replacing the cabinets, including affordable improvements, decorating tricks, lighting upgrades, and common mistakes to avoid. Whether you own your home or rent it, you can find ideas that suit your budget and the amount of change you are comfortable making.
1. Start by Understanding Why Your Kitchen Feels Dark
Before buying paint, new accessories, or lighting fixtures, take a few minutes to work out what is actually making your kitchen feel dark.
Two kitchens with identical cabinets can look completely different. One may feel warm and inviting, while the other feels gloomy. The difference often comes down to the lighting, wall colors, surrounding finishes, and the way the room is arranged.
Walk into your kitchen during the day and again after sunset. Notice which areas look darkest and where the shadows collect.
Ask yourself a few questions:
- Does natural light reach the kitchen, or is the window small or blocked?
- Are the walls painted in a dark, muddy, or yellowish shade?
- Is there enough light over the countertops?
- Do the countertops, flooring, backsplash, and cabinets all have similar dark tones?
- Are small appliances and everyday items covering most of the available counter space?
- Do the light fixtures create shadows rather than illuminating the room evenly?
Your answers will help you decide where to spend your time and money.
For example, if the kitchen has dark cabinets but plenty of natural light, changing the wall color and simplifying the countertops might be enough. If the room is dark even at midday, improving the lighting will probably make a bigger difference than buying decorative accessories.
It is also helpful to identify the main problem rather than trying to change everything at once. A kitchen that feels dark because of poor lighting needs a different solution from one that feels dark because every surface is brown or charcoal.
Try this simple test
Choose a small section of your kitchen and temporarily remove anything that is not essential. Clear the counter, move a few decorative items, and open the curtains or blinds fully.
Then turn on the existing lights and look at the space again.
If the kitchen already feels lighter, visual clutter and blocked light may be contributing to the problem. If it still feels gloomy, you may need to focus on lighting, wall colors, or the surfaces around the cabinets.
This small experiment costs nothing and gives you a useful starting point.
2. Improve the Lighting Before Changing Anything Else
If there is one improvement I would prioritize in a dark kitchen, it is better lighting.
Cabinet colors often receive the blame for making a kitchen feel gloomy, but poor lighting can make even light-colored cabinets look dull. When the room has one weak ceiling fixture, the light may illuminate the middle of the floor while leaving the countertops and cabinet fronts in shadow.
The solution is to use several sources of light rather than relying on one fixture.
Interior designers often describe this as layered lighting. In practical terms, it means combining general room lighting with focused lighting for cooking and softer lighting for atmosphere.
Upgrade the main ceiling light
Start with the main light fixture. If it is old, dim, or poorly positioned, replacing the bulb or updating the fixture may improve the entire room.
Choose a bulb with enough brightness for the size of your kitchen, and check the fixture’s maximum wattage or LED compatibility. Lumens indicate how much light a bulb produces, while watts indicate how much power it uses.
For many kitchens, a warm-neutral or neutral-white color temperature around 3000K to 4000K is a useful starting point. The best choice depends on the existing finishes and the atmosphere you prefer.
- Around 2700K: Warm and cozy, but some kitchens may appear more yellow.
- Around 3000K: Warm-neutral light that often works well with wood cabinets.
- Around 3500K: A balanced option for kitchens with mixed warm and cool finishes.
- Around 4000K: A cleaner, more neutral appearance that can work well in contemporary spaces.
Avoid assuming that the highest color temperature is automatically the brightest or best. A very cool bulb can make a warm, traditional kitchen feel harsh, especially when paired with brown cabinets and beige countertops.
Also check the bulb’s color rendering index, or CRI. A CRI of 90 or higher is often desirable when you want food, wood, paint, and countertop colors to appear more natural.
Add under-cabinet lighting
Under-cabinet lighting is one of the most useful upgrades for a kitchen with dark cabinets.
It illuminates the countertop directly, making the work surface easier to use while reducing the heavy shadow created by upper cabinets. It also adds a subtle glow that makes the kitchen look more thoughtfully designed.
You do not necessarily need an electrician or an expensive installation. Depending on your layout and electrical requirements, options include:
- Plug-in LED light bars
- Rechargeable under-cabinet lights
- LED strip lighting
- Hardwired LED fixtures installed by a qualified electrician
Choose a product with even light distribution and a color temperature that works with your other bulbs. Dots of exposed LED light can look distracting, so diffused strips or covered fixtures often create a cleaner effect.
For a more polished result, position the light toward the front portion of the cabinet underside so it illuminates the work surface rather than creating a bright strip against the wall.
If you prepare food regularly, prioritize adequate task lighting over decorative lighting. A beautifully illuminated backsplash is nice, but being able to see what you are chopping matters more.
Think about lighting inside darker areas
Some kitchens have deep cabinets, shadowy corners, or a pantry area that seems almost black when the door is open. Small battery-powered or rechargeable lights can make these spaces easier to use.
These lights will not transform the entire room, but they can remove pockets of darkness that make the kitchen feel less inviting.
A practical tip: Before purchasing multiple fixtures, test one light in the darkest working area. That will help you judge the brightness, color temperature, and appearance before committing to a larger setup.
3. Use Lighter Wall Colors to Balance Dark Cabinets
Dark cabinets can look much less imposing when the walls around them are lighter.
If your cabinets are espresso brown, deep walnut, or reddish cherry, consider a soft white, warm off-white, pale greige, or very light neutral shade for the walls. These colors create contrast without forcing you to change the cabinetry.
However, choosing the right white is more complicated than it sounds. Some whites have strong yellow undertones, while others look blue or gray in certain lighting. A shade that appears beautiful in a brightly lit showroom may look dull in your kitchen.
Choose a wall color that works with your cabinets
Look at the undertones in the existing finishes.
If your cabinets have warm reddish or golden tones, a soft warm white or balanced cream may feel more natural than a stark, icy white. If your cabinets are cool charcoal or nearly black, a cleaner white or pale neutral can create a crisp contrast.
For dark brown cabinets, light greige is often worth considering because it softens the transition between dark wood and white surfaces. Pale beige can also work, especially when the kitchen has warm flooring or natural wood details.
The aim is to make the room feel brighter without making the cabinets look disconnected from everything around them.
Test paint samples before committing
Paint a few sample patches on different walls, ideally large enough to see how the color behaves in the room.
Look at them in the morning, afternoon, and evening. Turn on your kitchen lights and observe how the paint changes.
A wall that receives cool northern light may make a warm white appear muted. A room with warm artificial lighting may make a gray paint look beige.
If repainting the entire kitchen is not practical, focus on the walls that have the greatest visual impact, particularly the open wall areas opposite the cabinets or around the window.
Remember that lighter walls do not have to mean plain white. A pale sage, muted ivory, or soft stone color can brighten the room while adding personality.
What if you cannot paint?
If you rent or simply do not want to repaint, you can still brighten the kitchen through lighter window treatments, removable wall décor, pale countertop accessories, and improved lighting.
The important thing is to create lighter areas around the cabinets. You do not have to change every surface to make the room feel more open.
4. Make the Most of Natural Light
Natural light can make a kitchen feel larger, fresher, and more welcoming. Unfortunately, it is easy to block it without realizing how much brightness is being lost.
Heavy curtains, dark blinds, crowded windowsills, and large decorative objects can prevent daylight from spreading through the room.
Fortunately, this is one of the easiest problems to address.
Replace heavy window coverings with lighter options
If your kitchen has thick curtains or dark fabric blinds, consider a lighter alternative.
Depending on your privacy needs, you might use:
- Sheer curtains that soften daylight without completely blocking it
- Light-colored roller blinds
- Simple cellular shades
- A bare window, if privacy and sun exposure allow it
White, ivory, pale linen, and light neutral shades can help the window feel less visually heavy.
If the kitchen faces a neighboring property or a busy street, you may need a covering that provides privacy. In that case, a translucent option or an adjustable blind can let you control the amount of light without leaving the window completely exposed.
Avoid adding thick fabric simply because it matches the rest of the room. Kitchens benefit from practical window treatments that are easy to clean and do not collect unnecessary grease or moisture.
Clear the windowsill
A windowsill crowded with plants, jars, decorations, and kitchen supplies can block part of the view and make the window feel smaller.
Try keeping only one or two items there. A small plant or a simple ceramic pot can add character without creating a visual barrier.
Move bulky appliances and tall objects away from the window whenever possible.
This does not mean your kitchen has to be completely bare. It simply means giving daylight enough room to enter and spread across the surrounding surfaces.
Avoid blocking light with unnecessary furniture
If you have a tall shelving unit, storage cart, or oversized freestanding cabinet positioned near a window, consider whether it could be moved elsewhere.
Even when an object does not cover the window itself, it can interrupt the way light travels through the room.
Before moving anything heavy, make sure the new location is safe and practical. You should never sacrifice a clear walkway or accessible storage just to make a room look brighter.
Keep the glass clean
This is an unglamorous suggestion, but it works. Dust, grease, and fingerprints can build up on kitchen windows, especially near cooking areas.
Cleaning the glass and window frame allows the available daylight to come through more clearly. It will not solve a room with very little natural light, but it is a simple maintenance task worth doing before investing in larger changes.
5. Introduce Lighter Countertop Colors Without Replacing the Countertops
Dark cabinets paired with dark countertops can make a kitchen feel especially heavy. When both surfaces occupy a large portion of the room, there may be very little visual contrast to break them up.
If replacing the countertops is outside your budget, you can still create a lighter overall effect by changing what sits on them and, where appropriate, refreshing their appearance.
Use lighter accessories strategically
Start by choosing a few practical items in lighter shades.
A cream utensil holder, pale cutting board, white ceramic canister, or light-colored fruit bowl can introduce contrast without requiring a major purchase.
The trick is to choose items that you will genuinely use. A countertop filled with decorative objects can become cluttered quickly, even if every item is white.
For example, place a large wooden cutting board against the backsplash, keep frequently used utensils in one light-colored container, and use a simple tray to group cooking oil and salt near the stove.
This creates small, intentional areas of contrast rather than scattering unrelated objects across the counter.
Consider a countertop refresh carefully
If the existing countertop is damaged, heavily stained, or visually overwhelming, you might consider a countertop refinishing product or professionally installed resurfacing system.
These options vary considerably in cost, durability, preparation requirements, and suitability for different materials. They are not all appropriate for every surface.
Before using a coating, verify that it is designed for your specific countertop material and intended use. Follow the manufacturer’s instructions for food-contact areas, curing time, ventilation, and cleaning. Do not assume an ordinary decorative paint is safe or durable enough for a kitchen work surface.
Peel-and-stick countertop coverings can also provide a temporary visual change, but their performance around sinks, hot appliances, seams, and frequently used preparation areas varies. They are generally better treated as a cosmetic solution than a permanent countertop replacement.
If you own the home and want a durable result, compare the total cost of refinishing with other options before starting. A cheaper surface treatment may not be economical if it needs frequent repair.
Create contrast rather than chasing perfection
You do not need every countertop to become white. In fact, a dark countertop can look attractive against dark cabinets when the rest of the kitchen has enough contrast.
A pale backsplash, light wall color, brighter lighting, and a few carefully chosen accessories may be all you need to create balance.
Think about the kitchen as a whole instead of judging each surface separately.
6. Refresh the Backsplash to Add Brightness and Contrast
The backsplash is one of the most visible areas of a kitchen. It sits directly above the countertops and often runs across a large section of the wall, so its color can strongly influence how dark or bright the room feels.
If your kitchen has dark cabinets, a backsplash in a lighter tone can help break up the solid block of color.
You do not necessarily need an expensive tile installation. The best approach depends on your existing backsplash, budget, cooking habits, and whether you own or rent the property.
Choose a backsplash that complements the cabinets
For dark brown cabinets, consider warm white, ivory, light beige, or pale stone. These colors provide contrast while maintaining a comfortable, natural appearance.
For black or charcoal cabinets, white or soft gray can create a sharper, more contemporary look. Pale green and muted blue may also work if you want a little color without making the kitchen feel busy.
Subtle patterns are often easier to live with than highly dramatic designs. A simple subway tile, understated mosaic, or softly veined surface can add interest without competing with the cabinet finish.
If your kitchen already has a patterned countertop, keep the backsplash relatively quiet. Too many patterns in a small area can make the room feel visually crowded.
Explore removable backsplash options
Renters and homeowners who want a temporary update may consider removable backsplash panels or peel-and-stick tiles.
These can be useful for changing the appearance of a wall without committing to a full renovation. However, not every product is suitable for every kitchen location.
Check whether the product is approved for use near a stove, exposed to moisture, or installed over the material you already have. Some products are not suitable for high-heat areas, and others may not adhere well to textured, greasy, or uneven surfaces.
Clean and prepare the wall according to the manufacturer’s directions, and test a small inconspicuous area if removal could damage the underlying finish.
Do not install a decorative covering near a cooktop unless the product’s specifications explicitly allow that use and the installation meets applicable safety requirements.
Clean the existing backsplash first
Sometimes the backsplash is not as dark as it appears. Grease, cooking residue, and discolored grout can make it look dull.
A careful cleaning may restore some of its original brightness.
Use a cleaner suitable for the tile or stone, and avoid harsh products that could damage the surface. Natural stone, in particular, may require a specialized cleaner.
If the tiles are in good condition but the grout looks tired, cleaning or refreshing the grout may create a surprisingly noticeable improvement.
The goal is to make the existing backsplash look intentional and well maintained before spending money on a replacement.
7. Update Cabinet Hardware for a Lighter, More Modern Look
You may not be able to change the cabinet color, but you can change the details that shape how the cabinets look.
Cabinet handles and knobs are small elements, yet they repeat throughout the kitchen. Updating them can make older cabinetry feel more considered and less dated.
The right hardware will not literally brighten a room the way a new light fixture does, but it can improve the overall impression and create a cleaner visual finish.
Choose hardware that suits the cabinet color
For dark brown cabinets, brushed brass or champagne-toned hardware can add warmth and a refined contrast. Brushed nickel and stainless steel offer a cooler, cleaner appearance.
Matte black hardware can look sleek on lighter cabinetry, but on very dark cabinets it may blend in rather than create contrast.
For black or charcoal cabinets, brushed brass, satin nickel, or a lighter metal finish can help the handles stand out.
There is no single finish that works for every kitchen. Consider your faucet, appliances, lighting fixtures, and other visible metal details before choosing.
You do not have to match every metal perfectly, but the finishes should feel related rather than accidental.
Pay attention to shape and scale
A simple, well-proportioned handle can make cabinets look more modern without drawing too much attention to itself.
Longer pulls may suit wide drawers, while smaller knobs can work well on compact doors. If your existing cabinets have traditional raised panels, hardware with a slightly classic shape may feel more natural than an extremely minimalist design.
Before ordering a full set, buy one or two samples and test them on the cabinets.
Check the size, finish, comfort, and hole spacing. Replacing hardware with pieces that use the same hole spacing is usually easier than drilling new holes.
If the new handles require different holes, think carefully about whether you are comfortable filling, repairing, and refinishing the old ones.
Clean the hardware you already have
If replacing hardware is not in the budget, start with a thorough cleaning.
Grease and fingerprints can dull metal finishes and make cabinets appear older than they are. Use a cleaning method appropriate for the material, and avoid abrasive products that could scratch plated or coated finishes.
Sometimes the simplest upgrade is making existing hardware look cared for.
8. Use Mirrors and Reflective Finishes Carefully
Reflective surfaces can help distribute light around a room, but they work best when used intentionally.
A mirror placed where it catches daylight can make a space feel more open. Glossy tile, glass, polished metal, and certain countertop finishes can also reflect light, although their effect depends on the surface and the angle of the light.
You do not need to turn your kitchen into a room full of shiny materials. Too many reflective finishes can create glare, show fingerprints, and make the space harder to maintain.
Find a useful place for a mirror
If you have an empty wall or dining nook near the kitchen, a mirror may help reflect light from a nearby window.
Choose a position that reflects something pleasant, such as daylight, greenery, or an open part of the room. A mirror that reflects a cluttered counter may simply make the clutter more noticeable.
Keep safety and practicality in mind. Avoid placing an ordinary decorative mirror where it could be exposed to excessive heat, splashing, or accidental impact.
In many kitchens, a mirror is more appropriate in an adjoining breakfast area than directly behind the cooking zone.
Use glass and polished accessories as accents
A glass vase, clear storage jar, or stainless-steel kettle can introduce a little visual lightness without adding another solid block of color.
However, the overall arrangement matters more than the material itself. A dozen glass jars lined up across a counter can still look crowded.
Choose a few useful pieces and leave enough empty space around them.
Do not assume glossy always means brighter
Glossy surfaces can reflect light, but they can also produce distracting highlights. A highly polished backsplash under a harsh ceiling fixture may show glare rather than creating a soft, bright atmosphere.
If your kitchen has limited natural light, focus first on improving the quality and distribution of the lighting. Reflective finishes can help, but they are not a substitute for sufficient illumination.
9. Bring in Lighter Textiles and Soft Furnishings
Textiles are an easy way to introduce lighter colors into a dark kitchen.
Tea towels, washable runners, seat cushions, and simple curtains can soften the room and create contrast without changing permanent surfaces.
Because these items are relatively affordable and easy to replace, they are useful when you want to experiment with color before committing to a larger project.
Choose colors that brighten without clashing
If your cabinets are dark wood, try warm white, oatmeal, pale sage, soft beige, or muted blue.
If your cabinets are black or charcoal, cream, light gray, and natural linen tones can create a balanced contrast.
You do not need to choose pure white for everything. A mixture of two or three complementary shades usually feels more natural than a kitchen filled with identical white accessories.
For example, imagine dark walnut cabinets paired with ivory tea towels, a pale beige runner, and a small green plant. The cabinets remain the main feature, but the lighter details help soften their visual weight.
Use a runner where it makes sense
A kitchen runner can add warmth to a long galley kitchen or an open stretch of floor. A lighter pattern may help break up dark flooring and make the space feel less enclosed.
Choose a washable, low-profile rug designed for the intended area. It should lie flat, have a suitable nonslip backing or mat, and stay clear of doors, appliances, and high-traffic routes.
Avoid placing loose textiles near open flames or where they could catch on hot cookware.
If you cook frequently, a rug that is difficult to clean may create more work than it is worth. In that case, lighter tea towels and window treatments may be more practical.
Keep fabric choices simple
A dark kitchen already has strong visual elements, especially if the cabinets have visible wood grain or decorative paneling.
Use textiles to soften the room rather than introducing multiple bold prints. One patterned runner can work beautifully with plain towels and simple window coverings.
The aim is to make the room feel coordinated, not decorated at every possible opportunity.
10. Add Plants and Natural Elements for a Fresher Feel
Dark cabinets can sometimes make a kitchen feel overly solid, especially when paired with dark countertops and flooring. Natural elements provide a useful contrast.
A small plant, a wooden cutting board, or a simple bowl of fresh fruit can introduce color and texture without making the room feel busy.
Choose plants that suit the available light
If your kitchen receives plenty of indirect daylight, you may have several plant options. If it has very little natural light, choose carefully and consider whether a grow light is needed.
Plants still need appropriate light, water, and airflow. A plant that struggles in a dim corner will not make the kitchen feel healthier or more inviting.
Try placing a suitable plant near a window, on a shelf that receives adequate light, or on a counter where it will not interfere with food preparation.
Keep soil, water, and leaves away from areas where they could contaminate food or create slippery surfaces.
Use natural materials to soften dark finishes
A wooden cutting board leaned against the backsplash can add warmth. A woven basket may work for dry goods or produce if it is easy to clean and kept away from moisture.
Ceramic bowls, stoneware containers, and simple wooden utensils can also introduce texture.
These materials do not need to match exactly. In fact, a few different natural textures often make a kitchen feel more lived-in and comfortable.
Avoid turning every surface into a display
One plant and one or two useful natural accessories are often enough.
If the counters are already crowded, adding more items may make the kitchen feel smaller. Consider removing a few unnecessary objects before introducing anything new.
The most effective styling often comes from choosing fewer items and giving each one room to be appreciated.
11. Declutter the Countertops to Make the Kitchen Feel More Open
This is one of the least expensive ways to make a dark kitchen look brighter, and it is often one of the most effective.
When countertops are covered with appliances, food packaging, jars, utensils, and miscellaneous items, the eye has to process too many shapes and colors. The room can feel busy and cramped even when the cabinets themselves are attractive.
Clearing the counters creates visible space. That empty space helps the lighter backsplash, wall color, and countertop surface stand out.
Start with the items you rarely use
Remove everything from one section of the countertop and sort the items into three groups:
- Things you use daily.
- Things you use occasionally.
- Things that do not need to live on the counter.
Keep frequently used appliances accessible if they genuinely make your daily routine easier. Store occasional-use appliances in cabinets or another suitable storage area when practical.
Do not remove something you rely on every day just to achieve a minimalist appearance. A kitchen needs to function for the people who use it.
The goal is to reduce unnecessary visual clutter, not make cooking inconvenient.
Create small, organized zones
Instead of spreading everyday items across the counter, group related things together.
For example, place your coffee maker, mugs, and coffee supplies in one area. Keep cooking oils and frequently used seasonings together on a washable tray near the cooking zone, provided they are safely positioned away from heat.
Store utensils in one container rather than several small holders.
Grouping items creates a sense of order, even if you still have quite a few things on display.
Use storage that blends with the room
If you need containers on the counter, choose a consistent color palette.
A few cream canisters, clear jars, or natural wood accessories may look calmer than packaging in multiple bright colors.
Label containers if that helps your routine, but keep the labeling simple and easy to read.
You do not need to purchase an entire matching set. Start with the items that are most visible and use what you already own wherever possible.
Give yourself one clear workspace
Try to keep at least one useful section of countertop relatively clear for food preparation.
This is practical as well as visual. A clear work area makes the kitchen easier to use and reduces the feeling that every surface is occupied.
If storage is limited, consider whether a drawer organizer, cabinet shelf insert, or wall-mounted utensil rail could move a few items off the counter.
Always install wall-mounted storage securely and avoid placing heavy objects where they could fall onto a work surface.